Connect your Unreal project to ShowServer
Run this on LAN ShowServer with optional BPMediaNode when you need a movie or device source. Already operate a Cloud-capable ShowServer? See Remote / Cloud studio after the LAN path works.
BPUnrealRTC connects directly to ShowServer. It publishes rendered video and program audio, receives ShowServer feeds, and exchanges data. BPMediaNode is optional: use it when you need a movie, capture device, or LAN feed to become a ShowServer source. It is not an intermediary required between Unreal and ShowServer.
This guide starts in your own Unreal Engine 5.8 Windows project. You do not need the sample project or a PowerShell launcher. The studio in the screenshots is simply an example scene.
1. Install BPUnrealRTC into your project
- Close Unreal Editor.
- Open the folder containing your project’s
.uprojectfile. Create aPluginsfolder if it does not exist. - Copy the built
BPUnrealRTCfolder intoPlugins. The resulting path isYourProject/Plugins/BPUnrealRTC/BPUnrealRTC.uplugin. Keep itsBinariesandBinaries/ThirdParty/Win64folders together with the plugin. - Reopen your project. Open Edit → Plugins, search BPUnrealRTC, and enable it. Restart the editor if requested.
- If you plan to use an existing CineCamera, also enable Epic’s CineCameraSceneCapture plugin and restart.
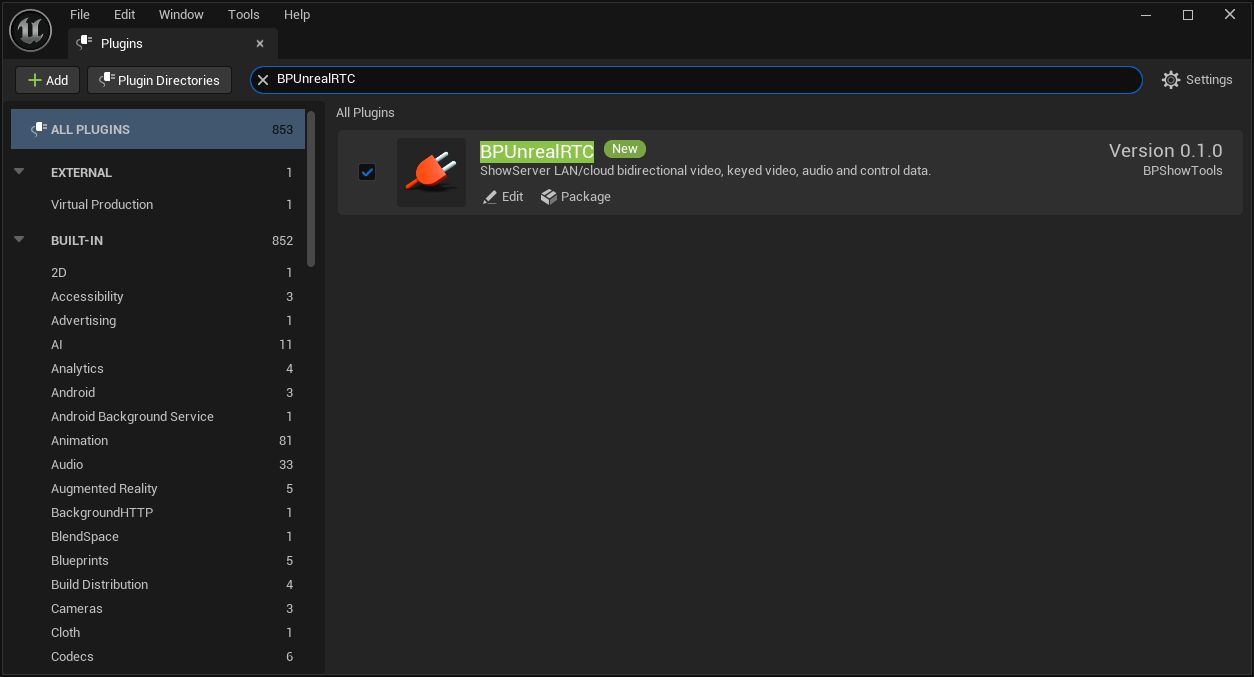
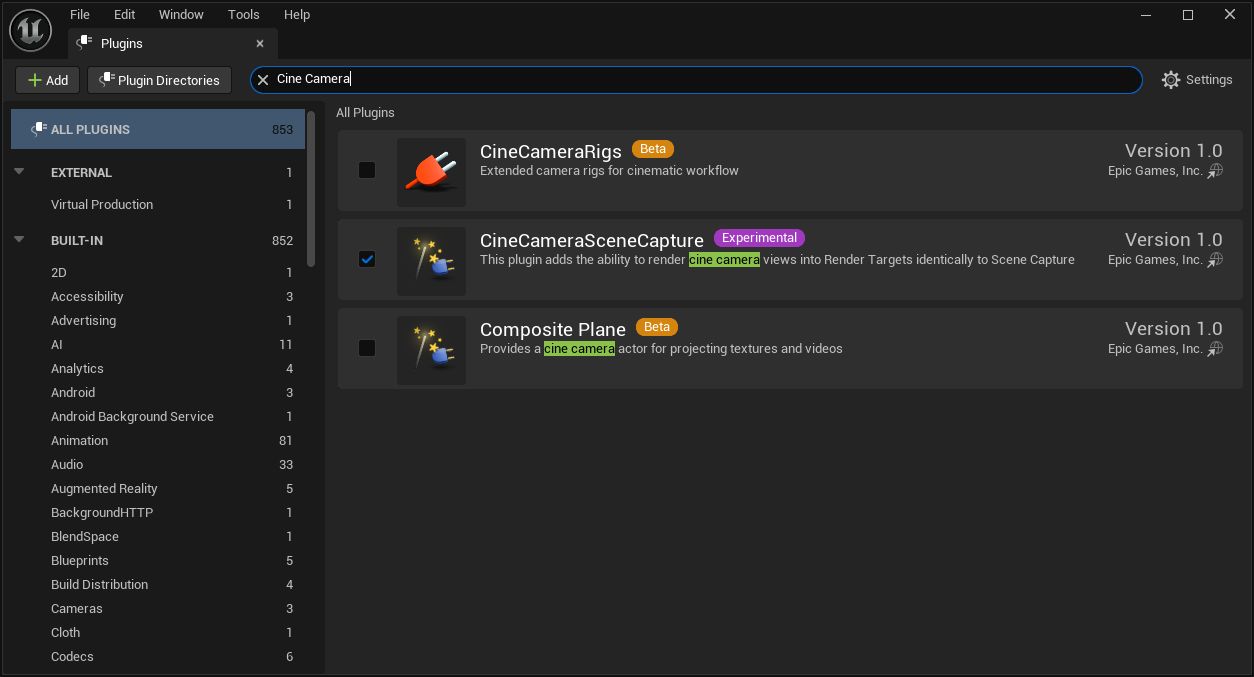
The supplied binary package targets UE 5.8 Windows x64. A source-only checkout is for developers who will build the plugin; it is not the binary installation described here.
2. Choose the camera you want to publish
Use your existing CineCamera
- Select the CineCamera actor in the Outliner. If it is a Blueprint, open that Blueprint.
- In Components, select its CameraComponent (the CineCameraComponent). Choose Add → Cine Capture Component 2D. Verify that the new component is a child of CameraComponent. Drag it under that component if needed.
- In the Content Browser, create a folder such as
RTC. Right-click inside it and choose Materials & Textures → Render Target. Name itRT_ShowServerCamera. - Open the render target. Set Render Target Format to RTF RGBA8, with a modest initial resolution such as 1280 × 720. Save it.
- Select the Cine Capture component. Assign
RT_ShowServerCamerato Texture Target. Set Render Target Highest Dimension to 1280 and Capture Source to Final Color (LDR) in RGB for this opaque example. Cine capture derives the other dimension from your camera’s aspect ratio; use a 16:9 filmback for a 1280 × 720 result. - On the same actor, choose Add → BPUnrealRTC. Assign
RT_ShowServerCamerato its Camera Output. - Frame your scene using the existing CineCamera. BPUnrealRTC sends the render target produced by that camera’s capture component.
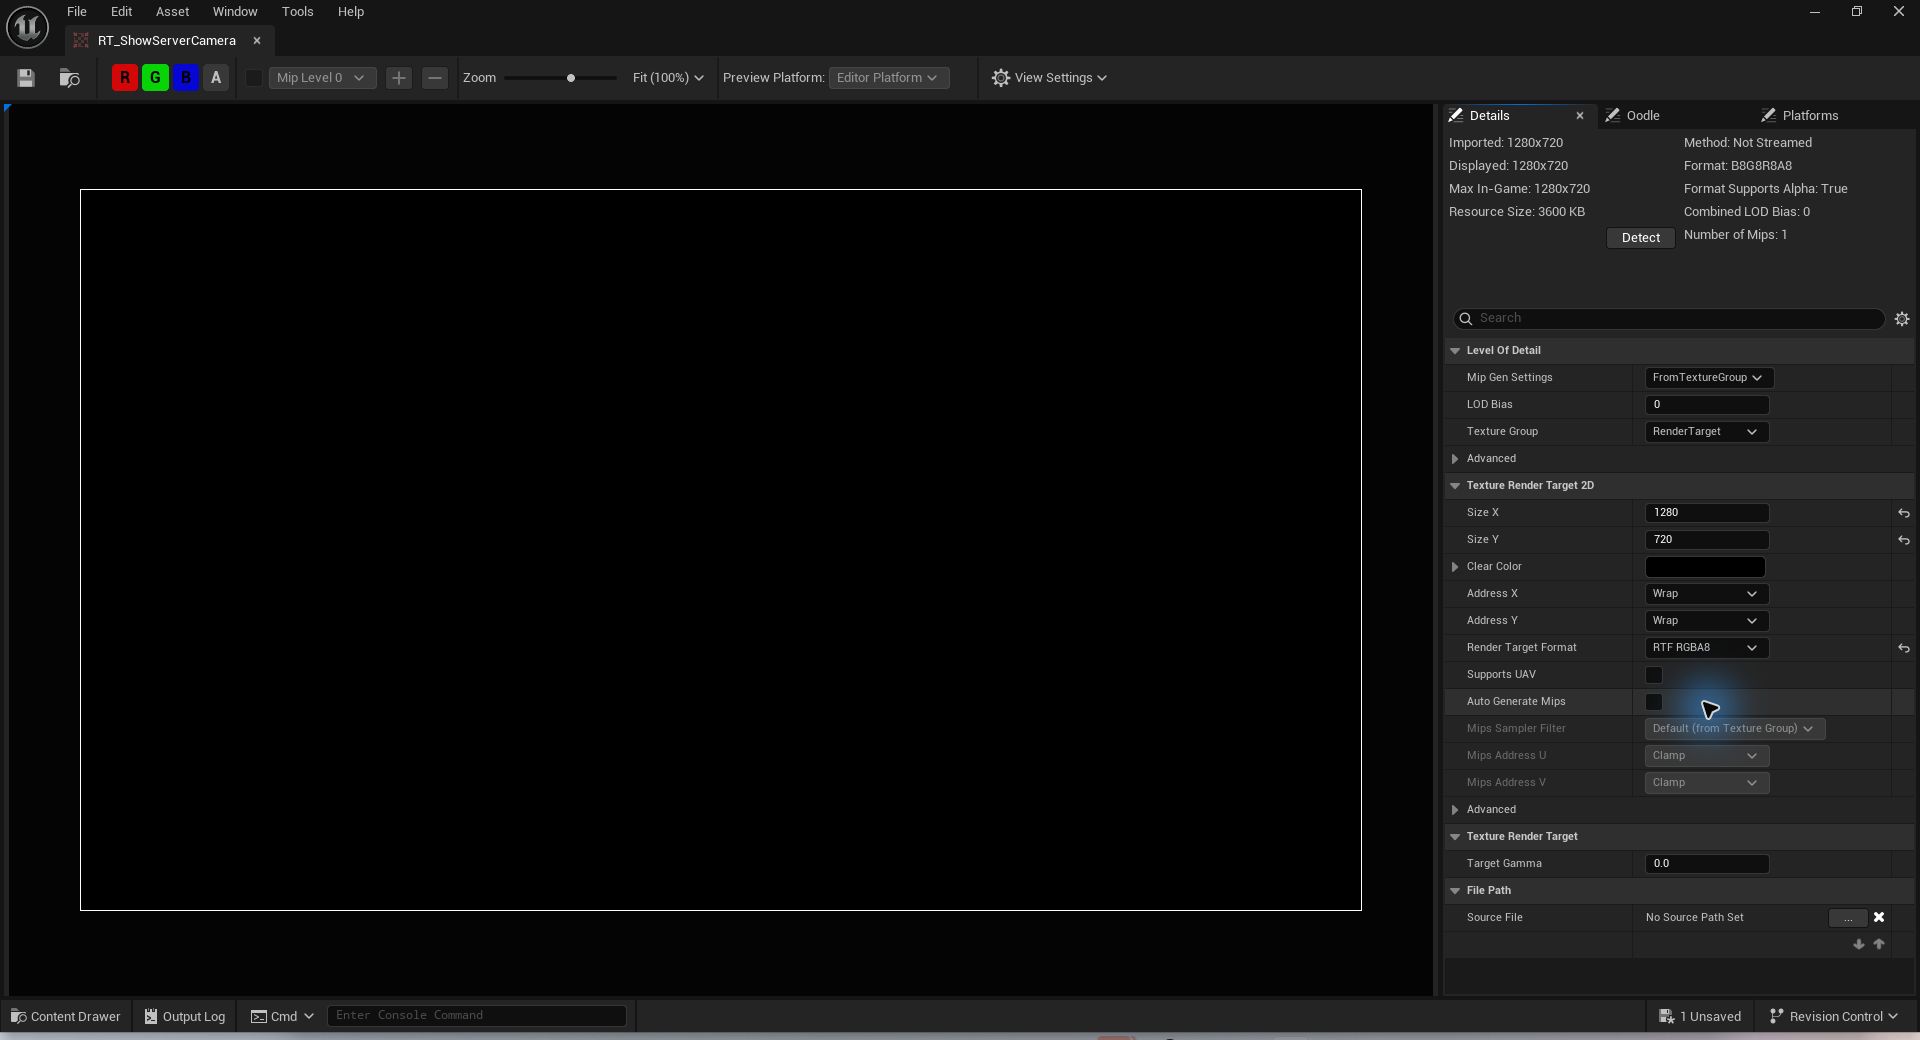
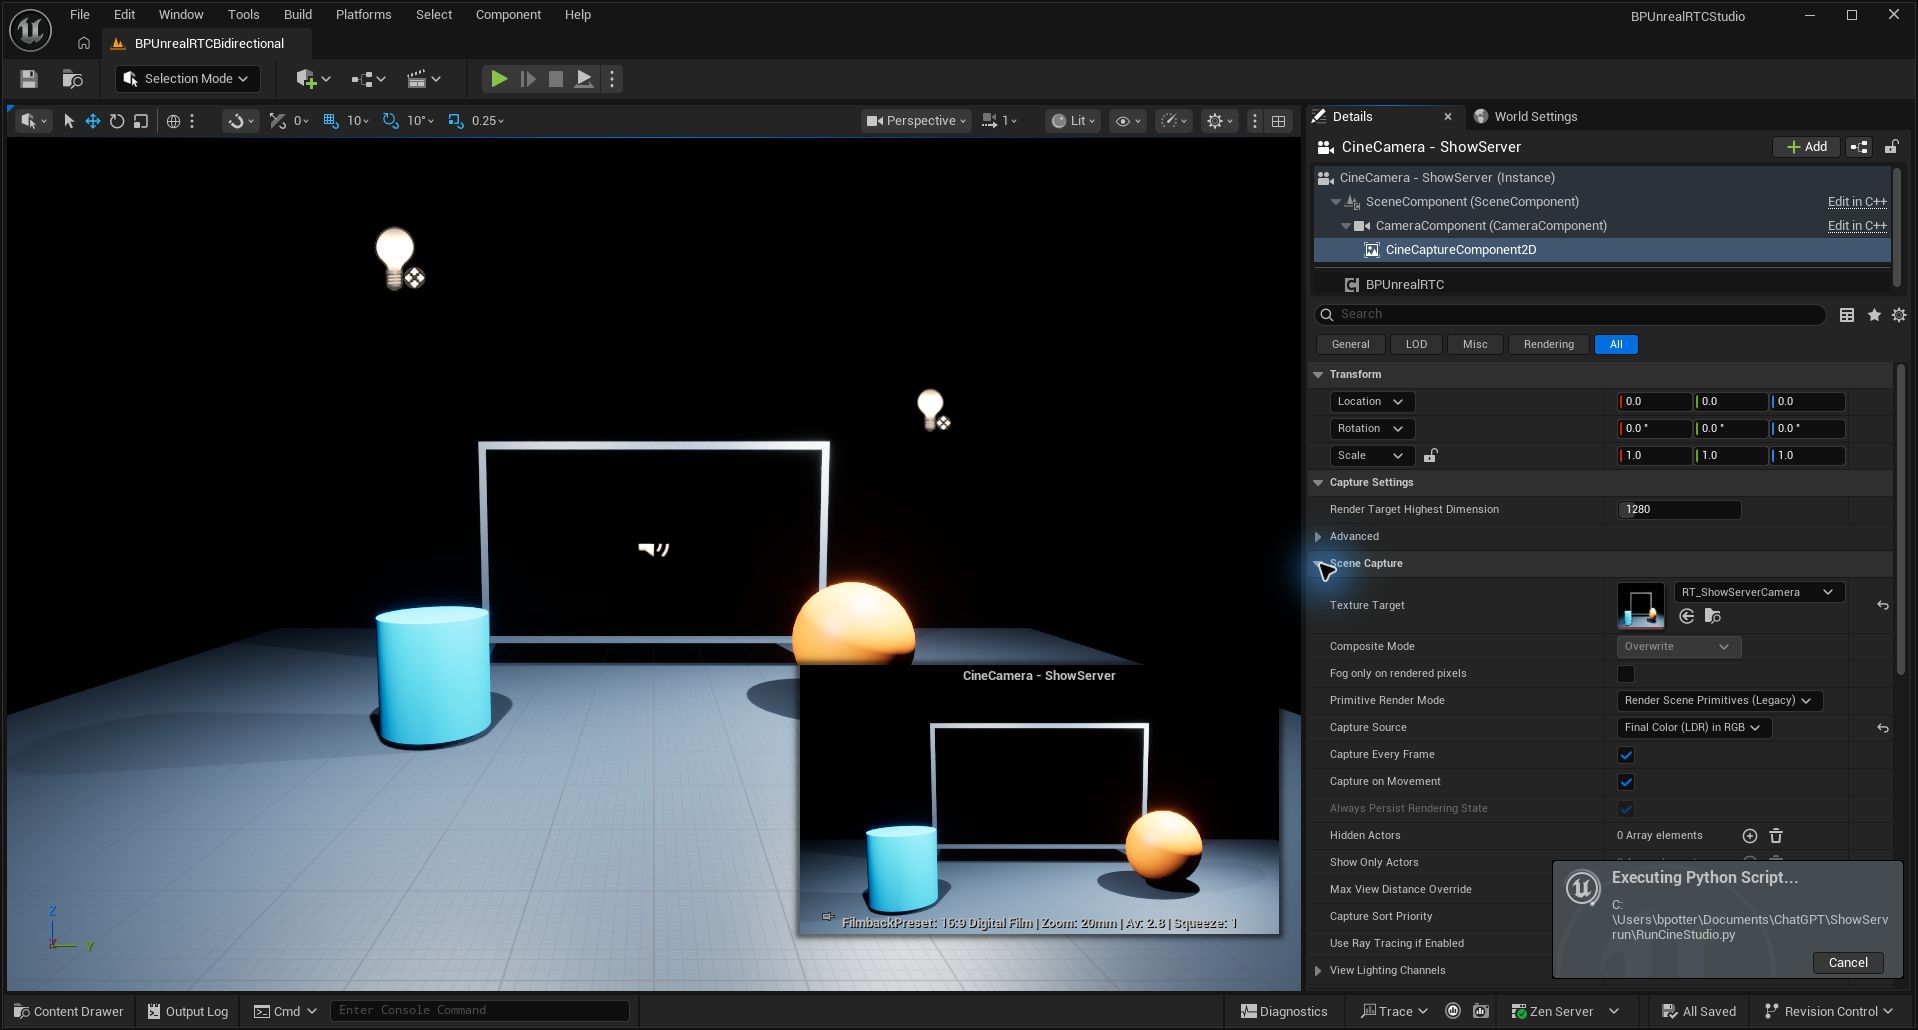
Cine capture renders an additional view. Check framing, exposure, post-processing and performance in your own scene. Keep its output size stable while streaming; changing size requires republishing.
Or use the supplied capture actor
- Open Window → Place Actors and search BPUnrealRTCCamera (displayed with spaces in some editor views).
- Drag it into your level and position it like any other camera.
- Select its ShowServer RTC component for the connection settings below.
This convenience actor includes a SceneCapture2D and creates its own render target when Play begins. You do not need to assign Camera Output manually for this actor. It does not replace or modify other cameras in your project.
3. Set up the direct connection
Select the BPUnrealRTC / ShowServer RTC component and expand ShowServer → Connection.
| Property | Initial value | Purpose |
|---|---|---|
| Base Url | Your ShowServer URL, for example http://SHOWSERVER:7474 | Connects directly to your venue server |
| Cloud | Off for LAN | Enable only for the ShowServer Cloud connection path |
| Display Name | Unreal Studio Return | Name shown to ShowServer receivers |
| Publish | On | Send your camera and any explicitly supplied audio |
| Alpha | Off initially | Enable later for a properly prepared fill/mask source |
| Auto Ndi | Off initially | Add venue NDI egress after validating the RTC feed |
| Source Id | The incoming ShowServer source’s ID | Leave empty for send-only use |
| Frames Per Second | 30 | Initial outgoing capture rate |
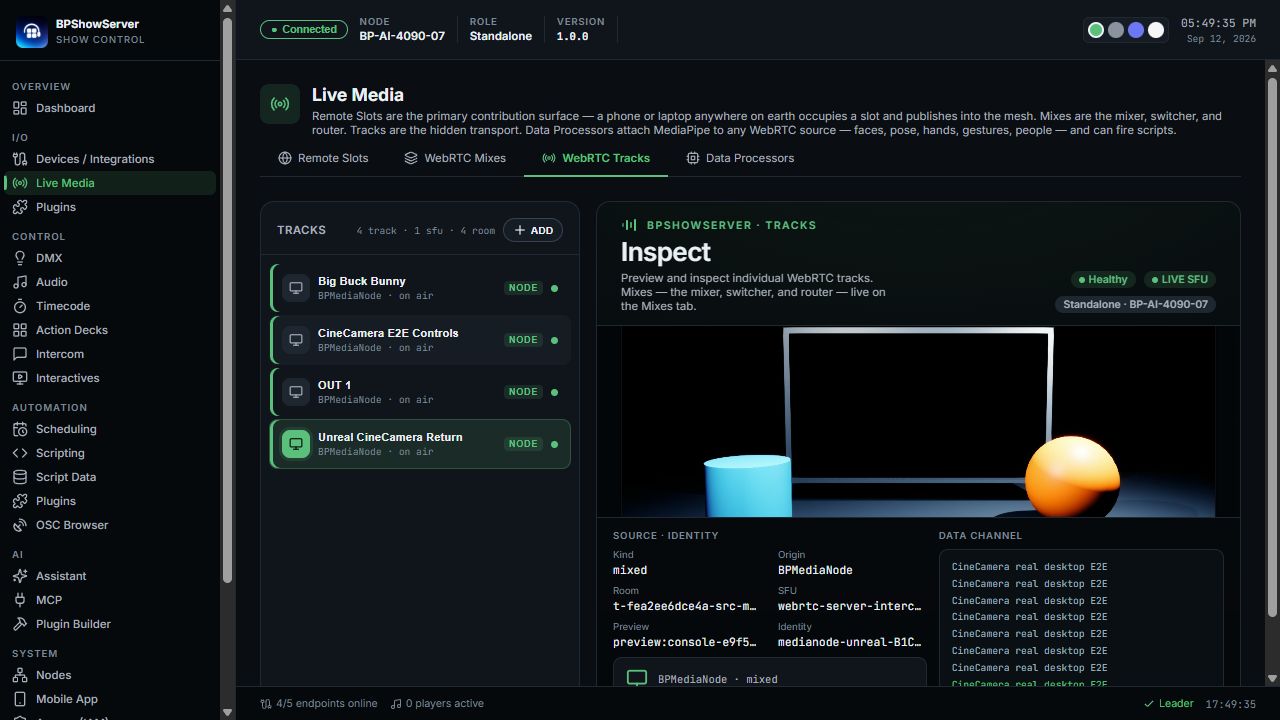
Source Id is not the display name. Select the desired source in ShowServer’s media tools or use the authenticated sources API (GET /api/v1/webrtc/sources). In Live Media → WebRTC Tracks, select the source and read Source · Identity → Identity. A source supplied by another Unreal instance, a ShowServer ingest, or MediaNode can all be received through this same component.
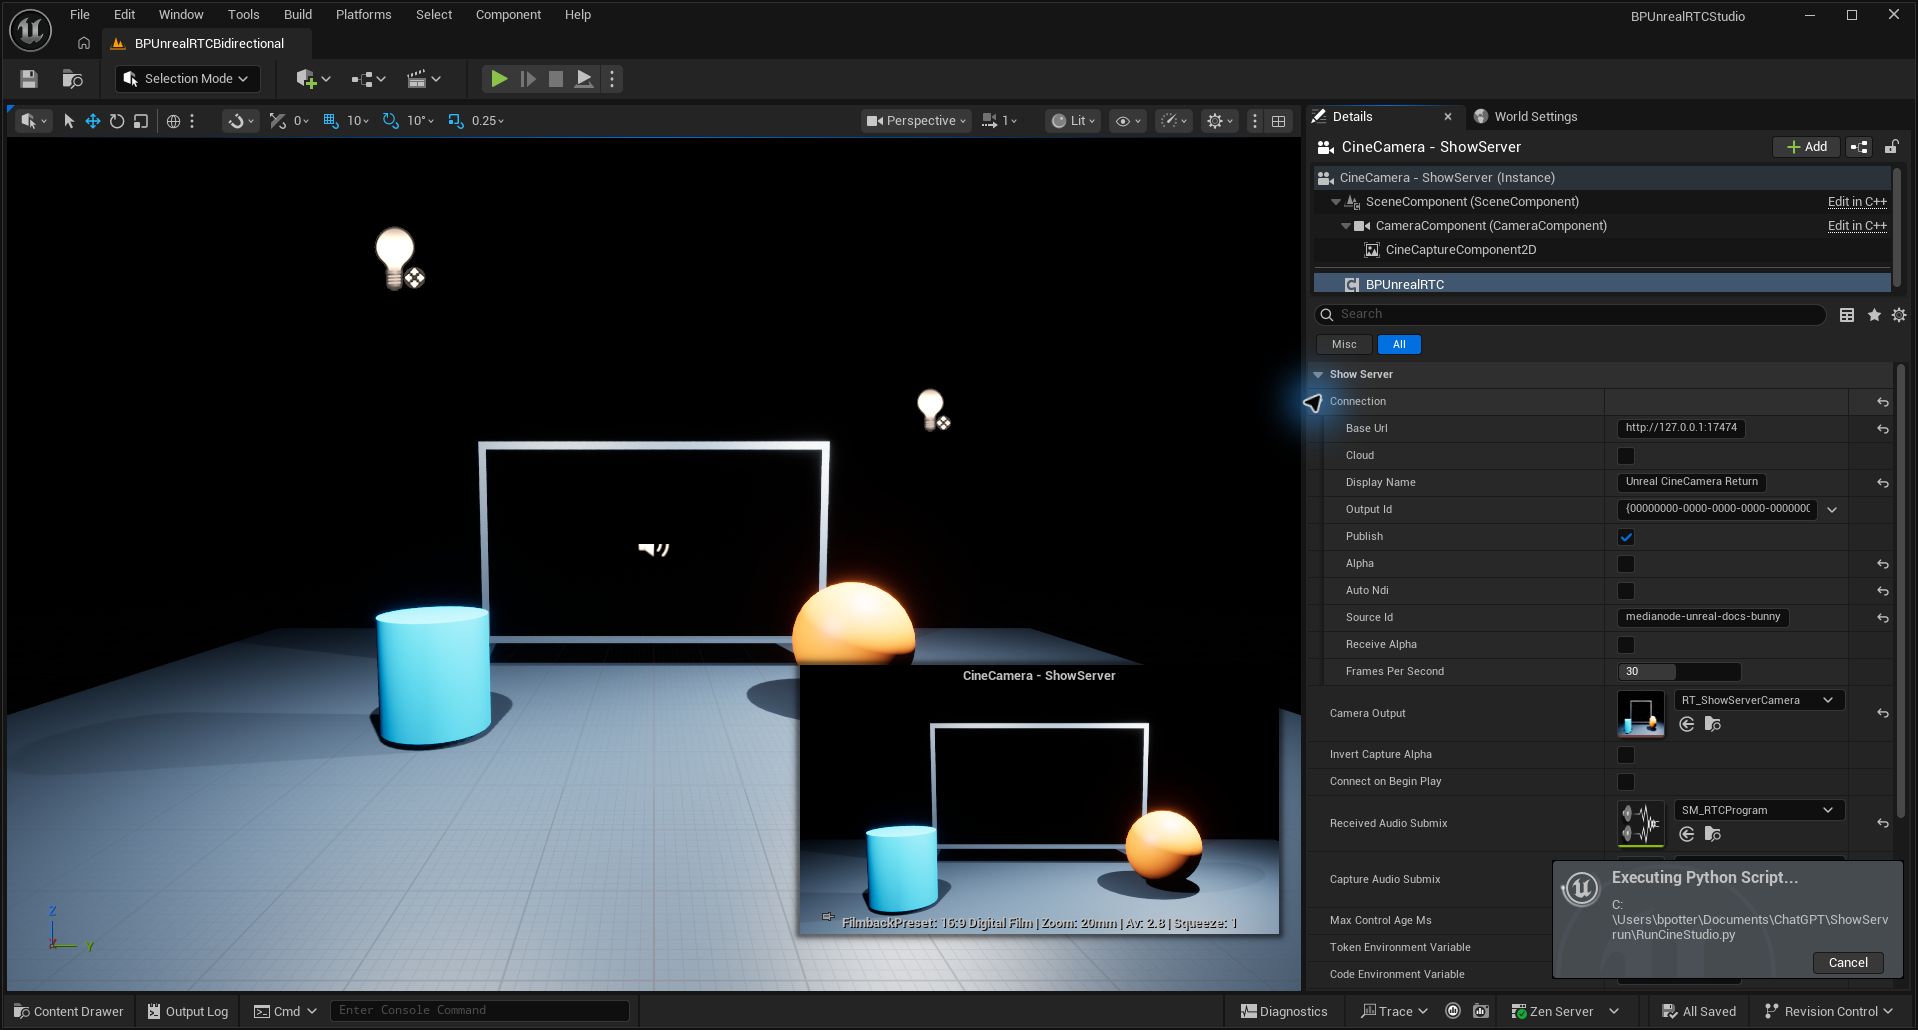
The screenshot uses a same-machine test server on port 17474. Use your reachable server address. Alpha is disabled for this first opaque-video check.
Connect from Blueprint, without a launcher
The component exposes a Blueprint Connect function with Token, Cloud Code, Username, and Password pins. It does not currently provide a built-in login dialog.
- If your CineCamera is already a Blueprint, open its Event Graph and drag the RTC component from Components into the graph as a reference. For an ordinary placed CineCamera actor, select it in the level, open Blueprints → Open Level Blueprint, right-click the graph and choose Create a Reference to CineCamera. Drag from that actor reference and use Get Component by Class, with BPUnrealRTCComponent as the class. Use the returned component for the following steps. A placed native CineCamera does not have its own Event Graph.
- Drag from that reference and add Connect. Its Target must be that RTC component.
- Call Connect from your project’s login/connect event. For LAN login, pass the runtime username and password and leave Token and Cloud Code empty. An existing session token can instead be passed to Token.
- Bind On Status to a text label or Print String while setting up. Publisher and subscriber report their state independently.
- Leave Connect On Begin Play off when your Blueprint calls Connect. That automatic option is intended for environment-provided credentials and is not needed for this workflow.
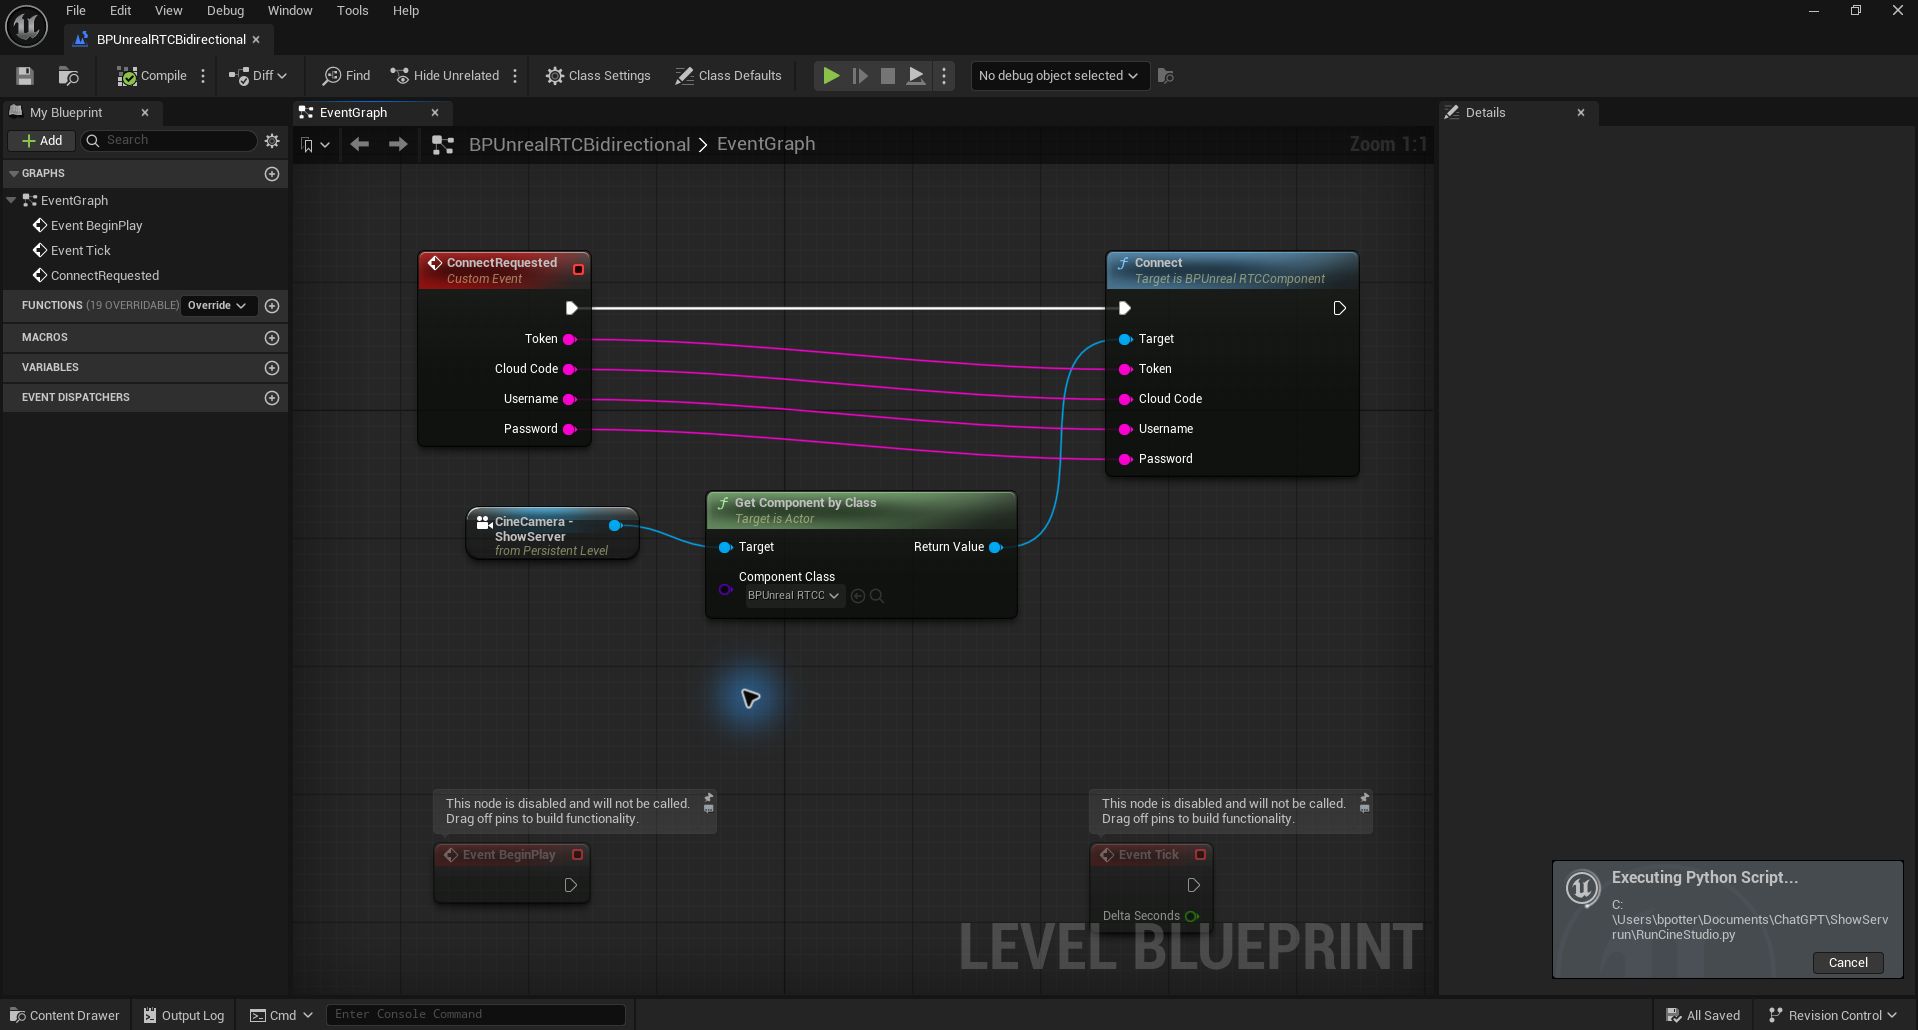
To reproduce this graph, add a Custom Event named ConnectRequested. Connect its execution output to Connect. Drag each string input pin from Connect onto the custom-event node to create matching event parameters. Compile and save. Invoke this event from your level logic after runtime credentials are available; the unused BeginPlay and Tick nodes in the screenshot do not invoke it. The pictured graph has been compiled, but the complete widget-to-event workflow still needs an operator acceptance pass.
For a project without a login screen, create a User Widget containing two Editable Text Box controls and a Connect button. Mark the password box Is Password. Give the widget an RTC-component object variable with Expose on Spawn enabled. From BeginPlay, create the widget, pass your component reference, add it to the viewport, and use Set Input Mode Game and UI. In the button’s On Clicked event, get each text box’s Text, convert it to String, and call Connect on the supplied component. This keeps credentials as runtime input rather than literals saved in the Blueprint.
Press Play, enter your login details in your own widget, and connect. The plugin manages subsequent network reconnection. If credentials expire, supply fresh credentials and call Connect again.
4. Check video going to ShowServer
- Open ShowServer and go to Live Media → WebRTC Tracks (
/livemedia/webrtc/tracks). - Find
Unreal Studio Returnand open its preview. - Move the camera or something in your Unreal scene. Confirm that the remote picture updates.
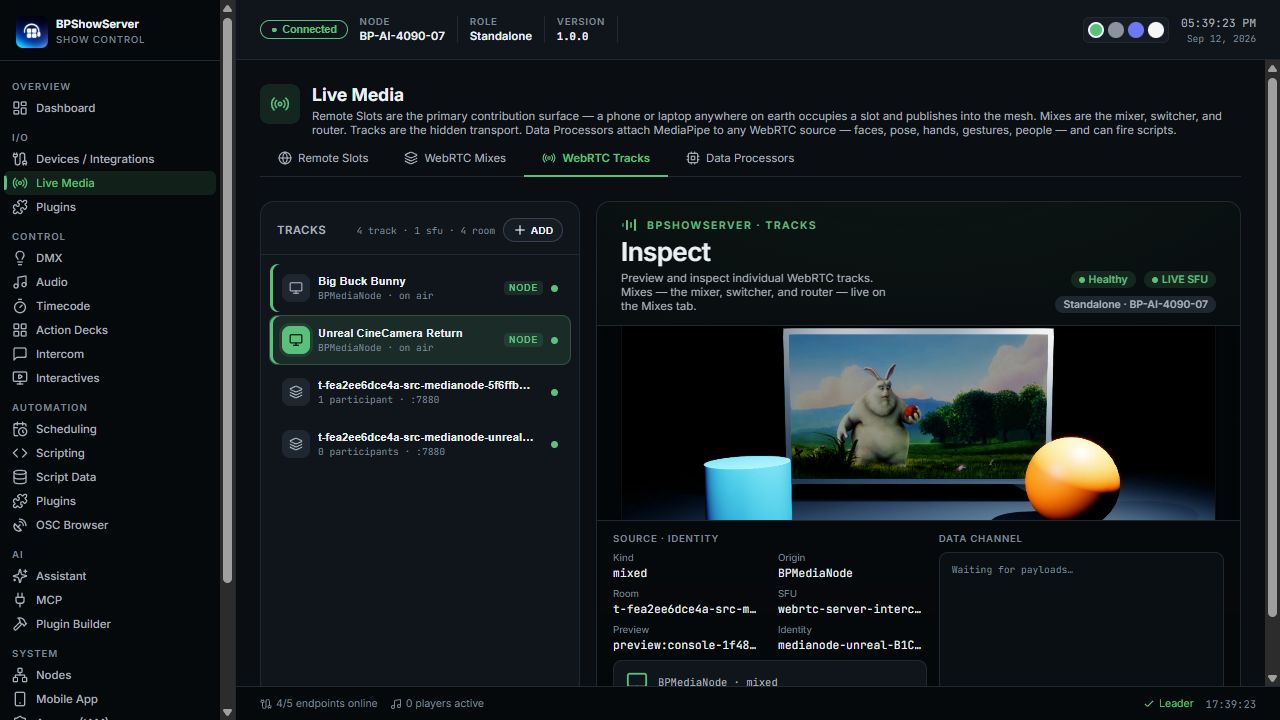
The preview includes Big Buck Bunny, © 2008 Blender Foundation / www.bigbuckbunny.org, CC BY 3.0.
You have now tested Unreal → ShowServer, with no MediaNode required. A live source label alone does not prove that frames are arriving; check the moving preview.
5. Put incoming ShowServer video on a surface
First make sure your desired input is available in ShowServer. If you need a movie source for this test, follow BPMediaNode movie setup, then return here.
- Create a material named
M_ShowServerVideoin yourRTCfolder and open it. - Set its Shading Model to Unlit. Enable Two Sided if the surface must be visible from both sides.
- Add a Texture Sample Parameter 2D node. Name its parameter RTCVideo, give it any valid default texture, and connect RGB → Emissive Color. Apply and save.
- Place a BPUnrealRTCVideoSurface actor in your level. Orient and scale its plane to form your virtual screen.
- Assign
M_ShowServerVideoto material Element 0 on its Video Screen component. - Set the screen actor’s Source Actor to the actor containing your connected RTC component. Set Texture Parameter to RTCVideo.
- Set that RTC component’s Source Id to your incoming feed’s ID before connecting. Connect again after changing it.
- Press Play and connect. The surface actor binds Received Texture to the material and updates it when the receive texture changes after reconnection or resizing.
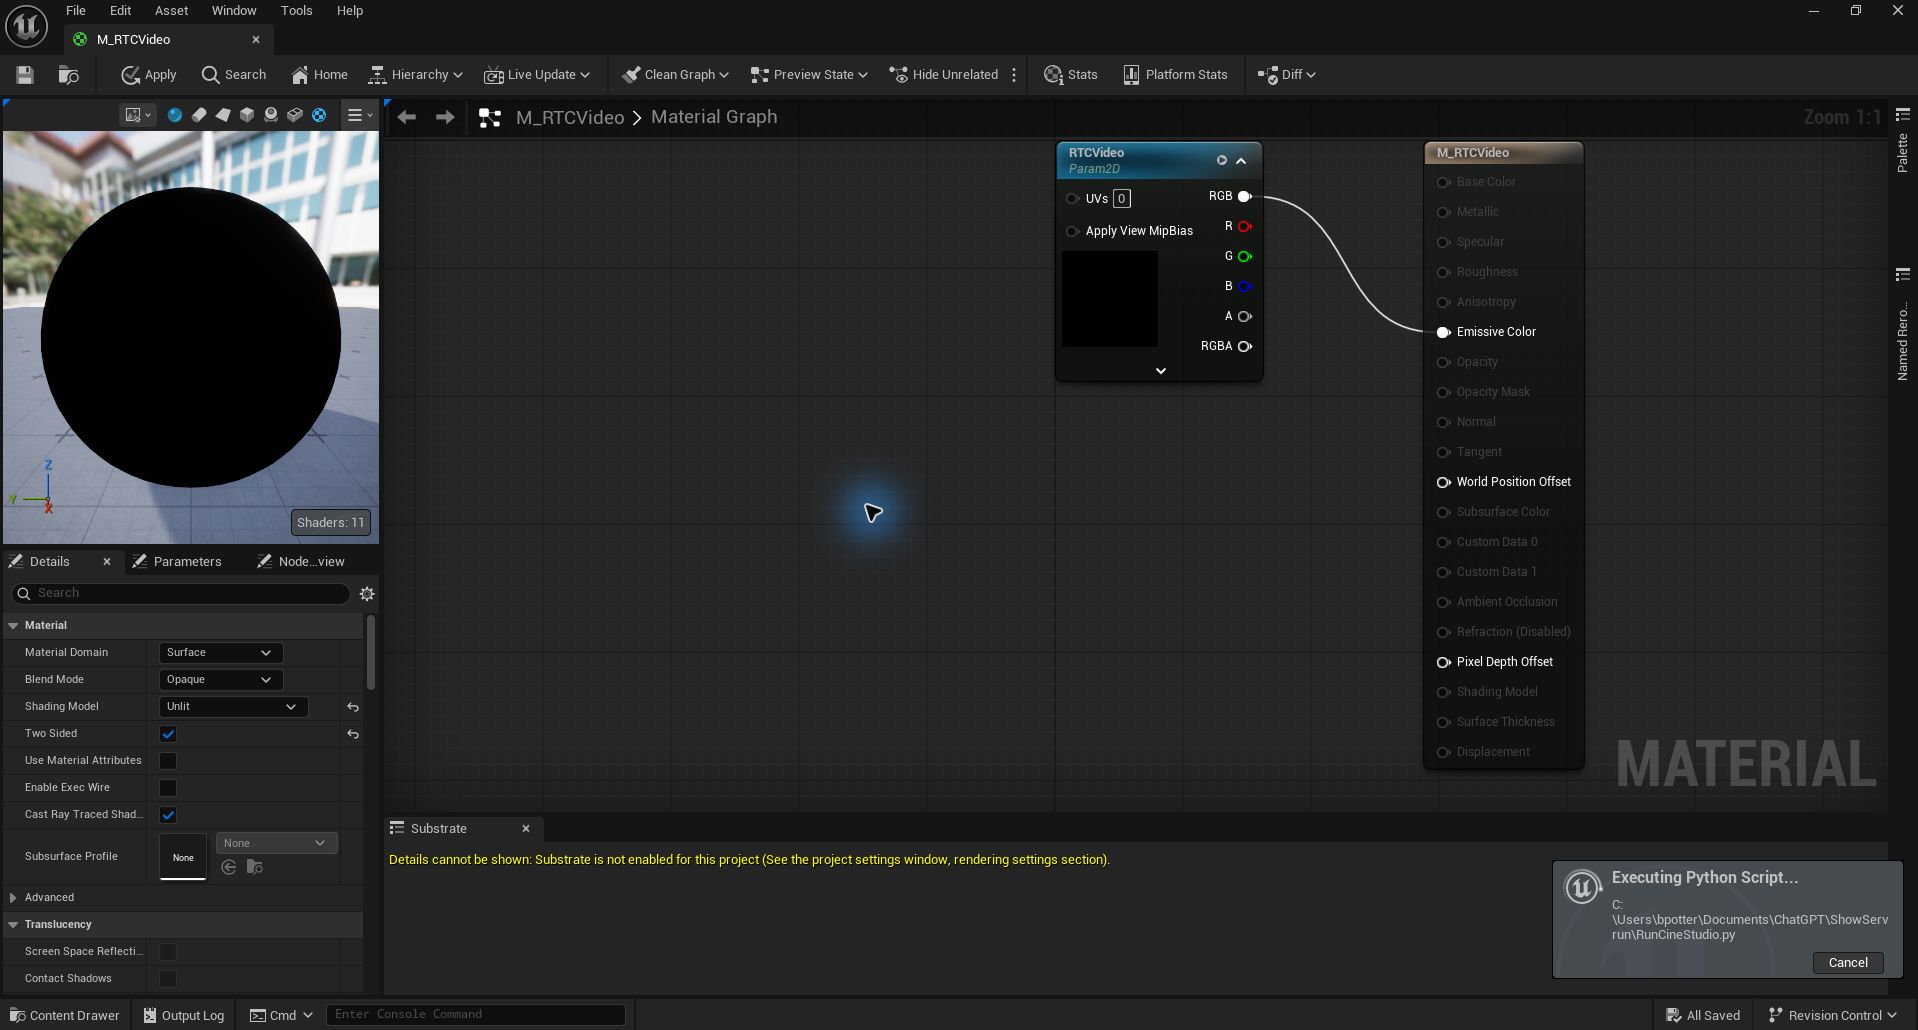
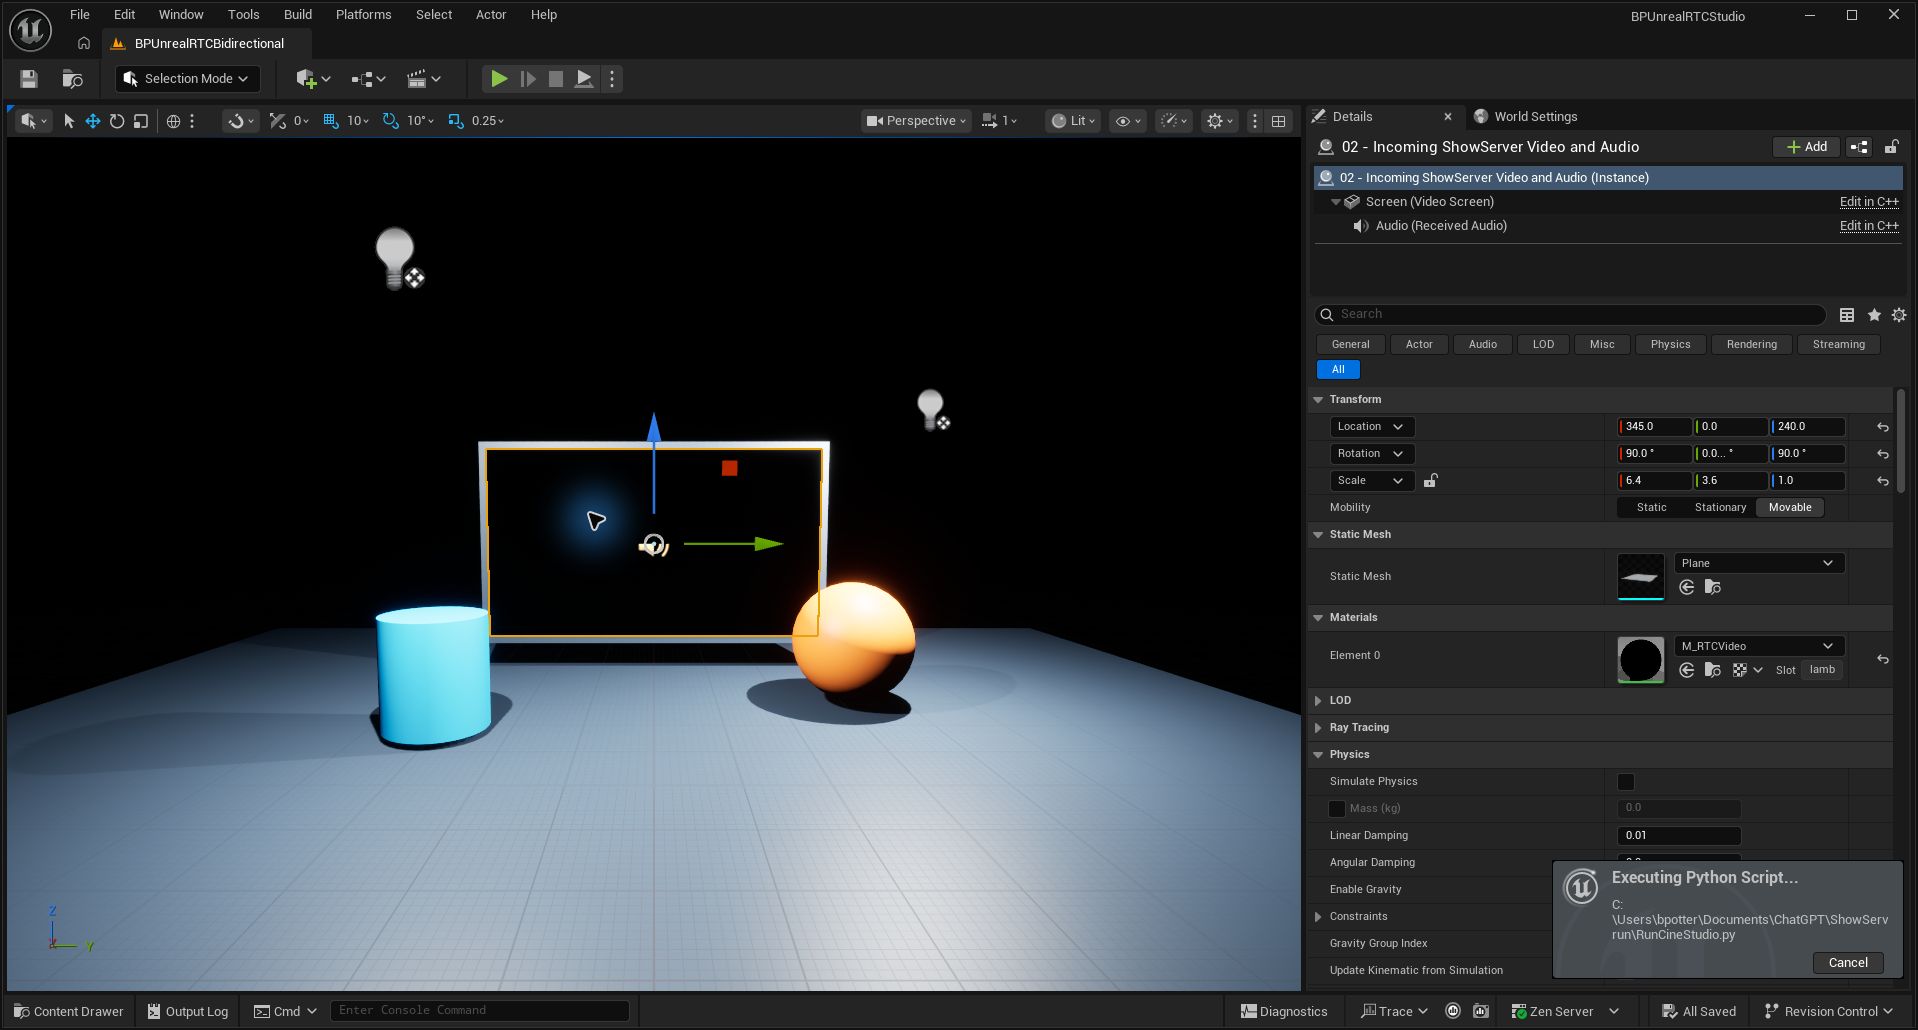
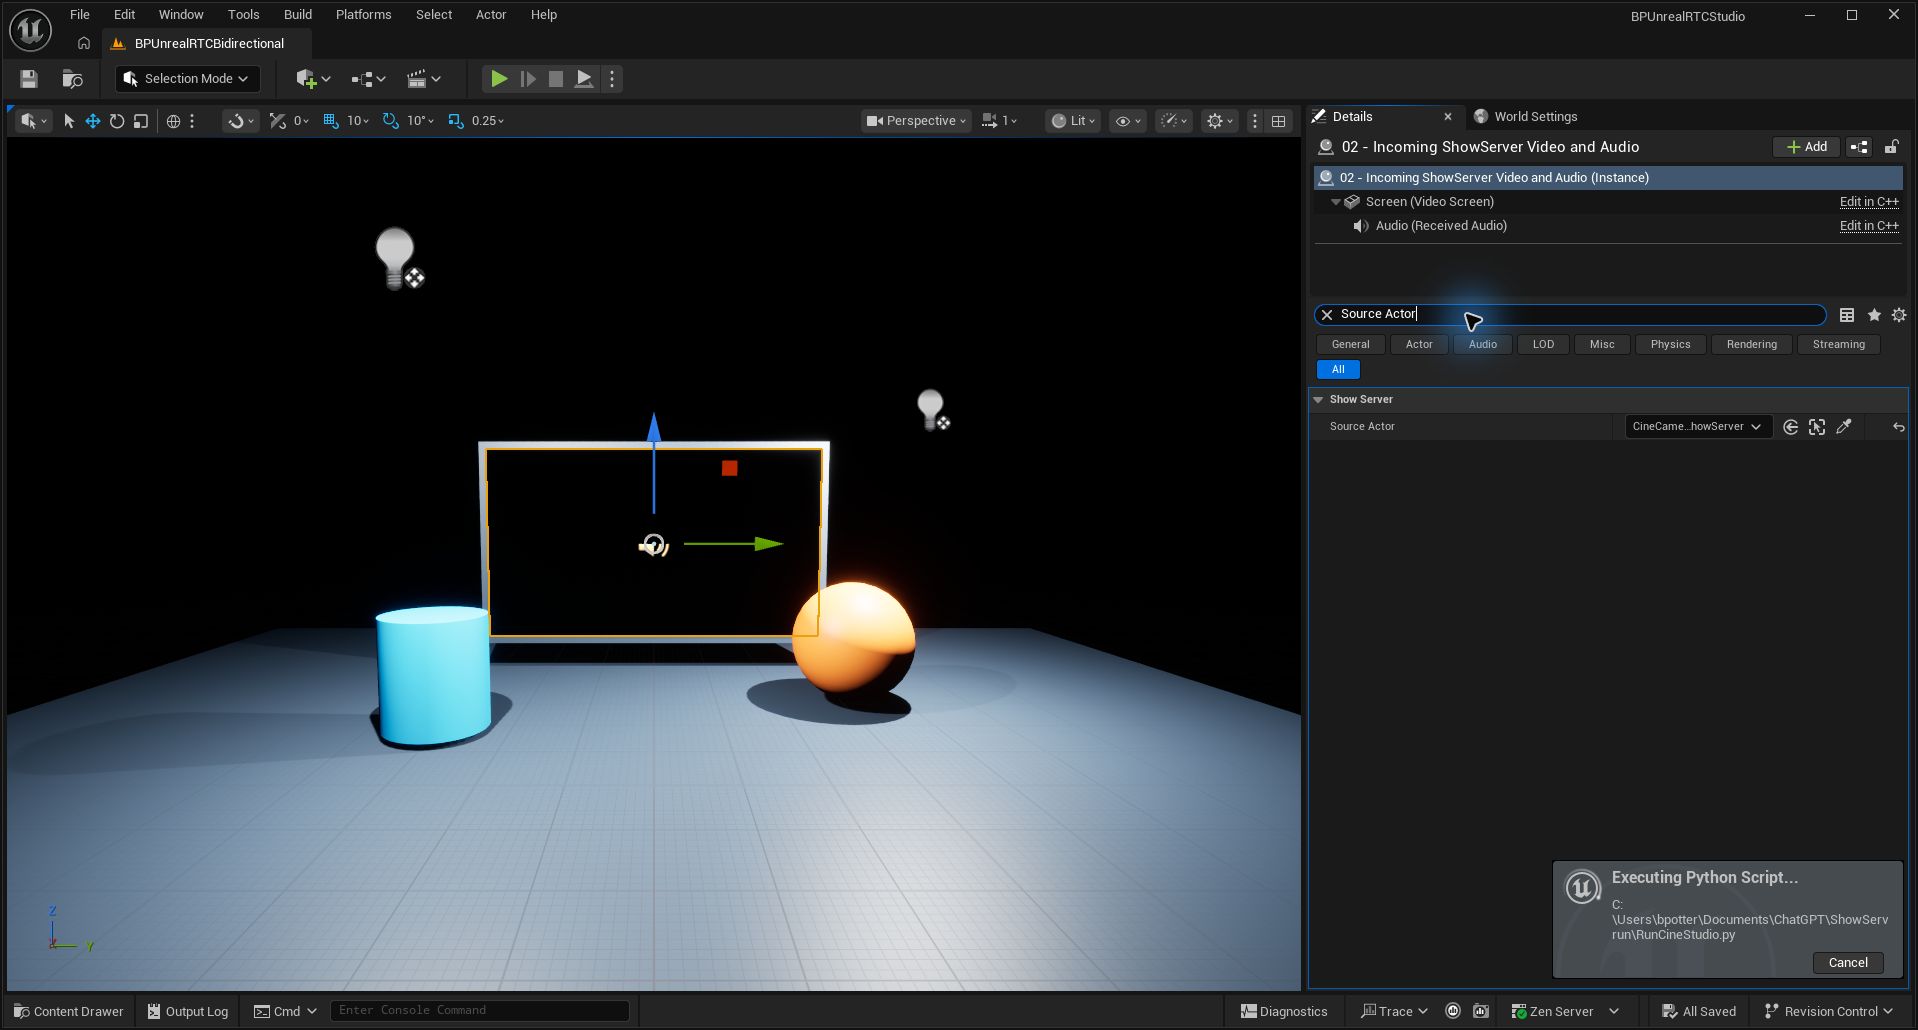
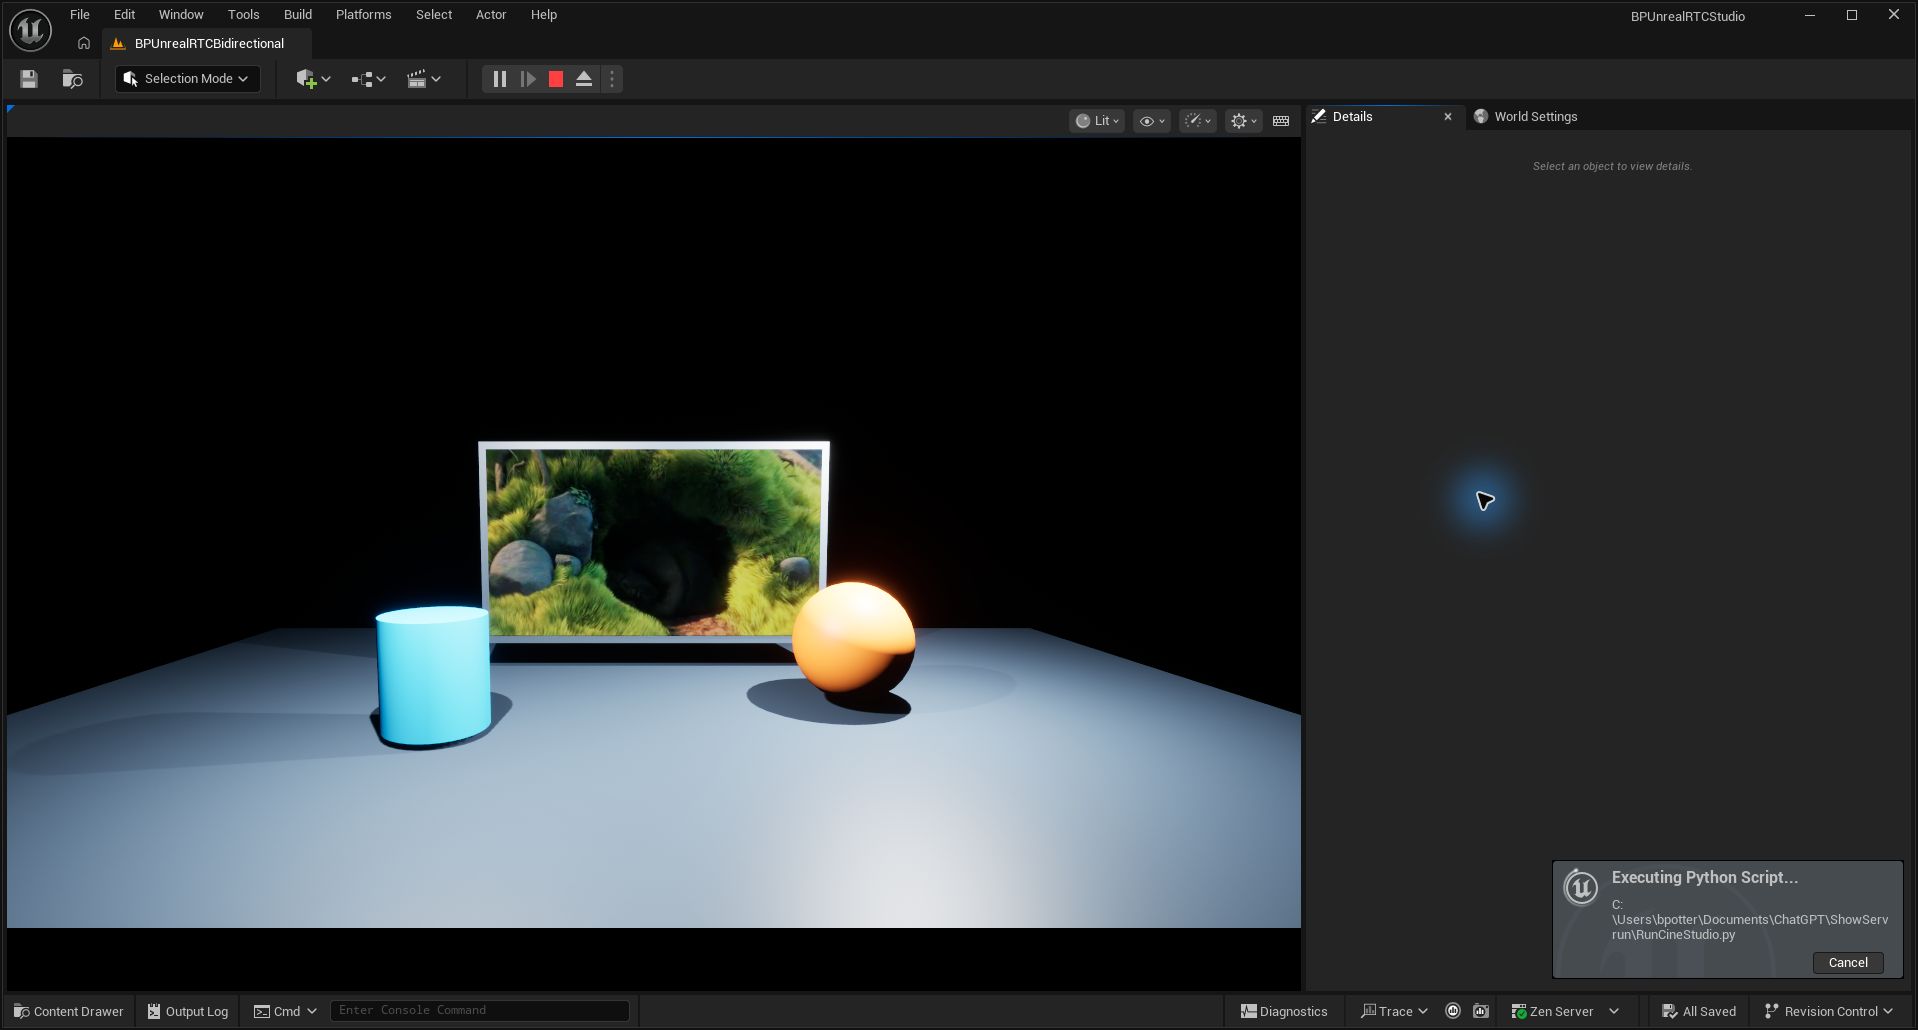
The black material preview and screen outside Play are expected in this example: the received texture is assigned at runtime. The editor captures include the diagnostic session’s Python status notification; running that script is not a user setup step. Big Buck Bunny attribution is in Sample media.
For your own mesh, use the same material technique: create a dynamic material instance, then set its RTCVideo texture parameter from the component’s Received Texture when the texture becomes available or changes. The convenience surface actor already performs that rebinding.
Keep the camera subscribed to the input feed, not to its own return, unless you deliberately want a recursive video effect.
6. Route audio in each direction
Receive: the surface actor’s Play Received Audio plays the RTC component’s received audio. Disable this on duplicate surfaces so one feed is not played repeatedly. A custom actor can instead play Received Audio through a non-spatialized Audio Component.
Send: publication of audio is explicit. Capturing a camera does not automatically capture the project’s audio mix.
- In the Content Browser, create Audio → Mix → Sound Submix and name it
SM_ShowServerProgram. - Route the sounds you want to publish to that submix, using each sound’s Sound Submix routing or an Audio Component’s Set Submix Send with send level 1.
- On the RTC component, set Capture Audio Submix to
SM_ShowServerProgrambefore connecting. Alternatively, call Capture Submix after Connect with that asset. - To include the incoming ShowServer audio in the outgoing program, also set Received Audio Submix to
SM_ShowServerProgrambefore connecting. - Set your project’s Windows audio mixer sample rate to 48000 under Project Settings → Platforms → Windows → Audio. This capture implementation expects 48 kHz. It sends stereo; surround channels beyond the first two are not mixed down.
- Check the receiving endpoint’s meter or recording, not just Unreal’s connection state. Keep loudspeaker monitoring muted when testing a return loop.
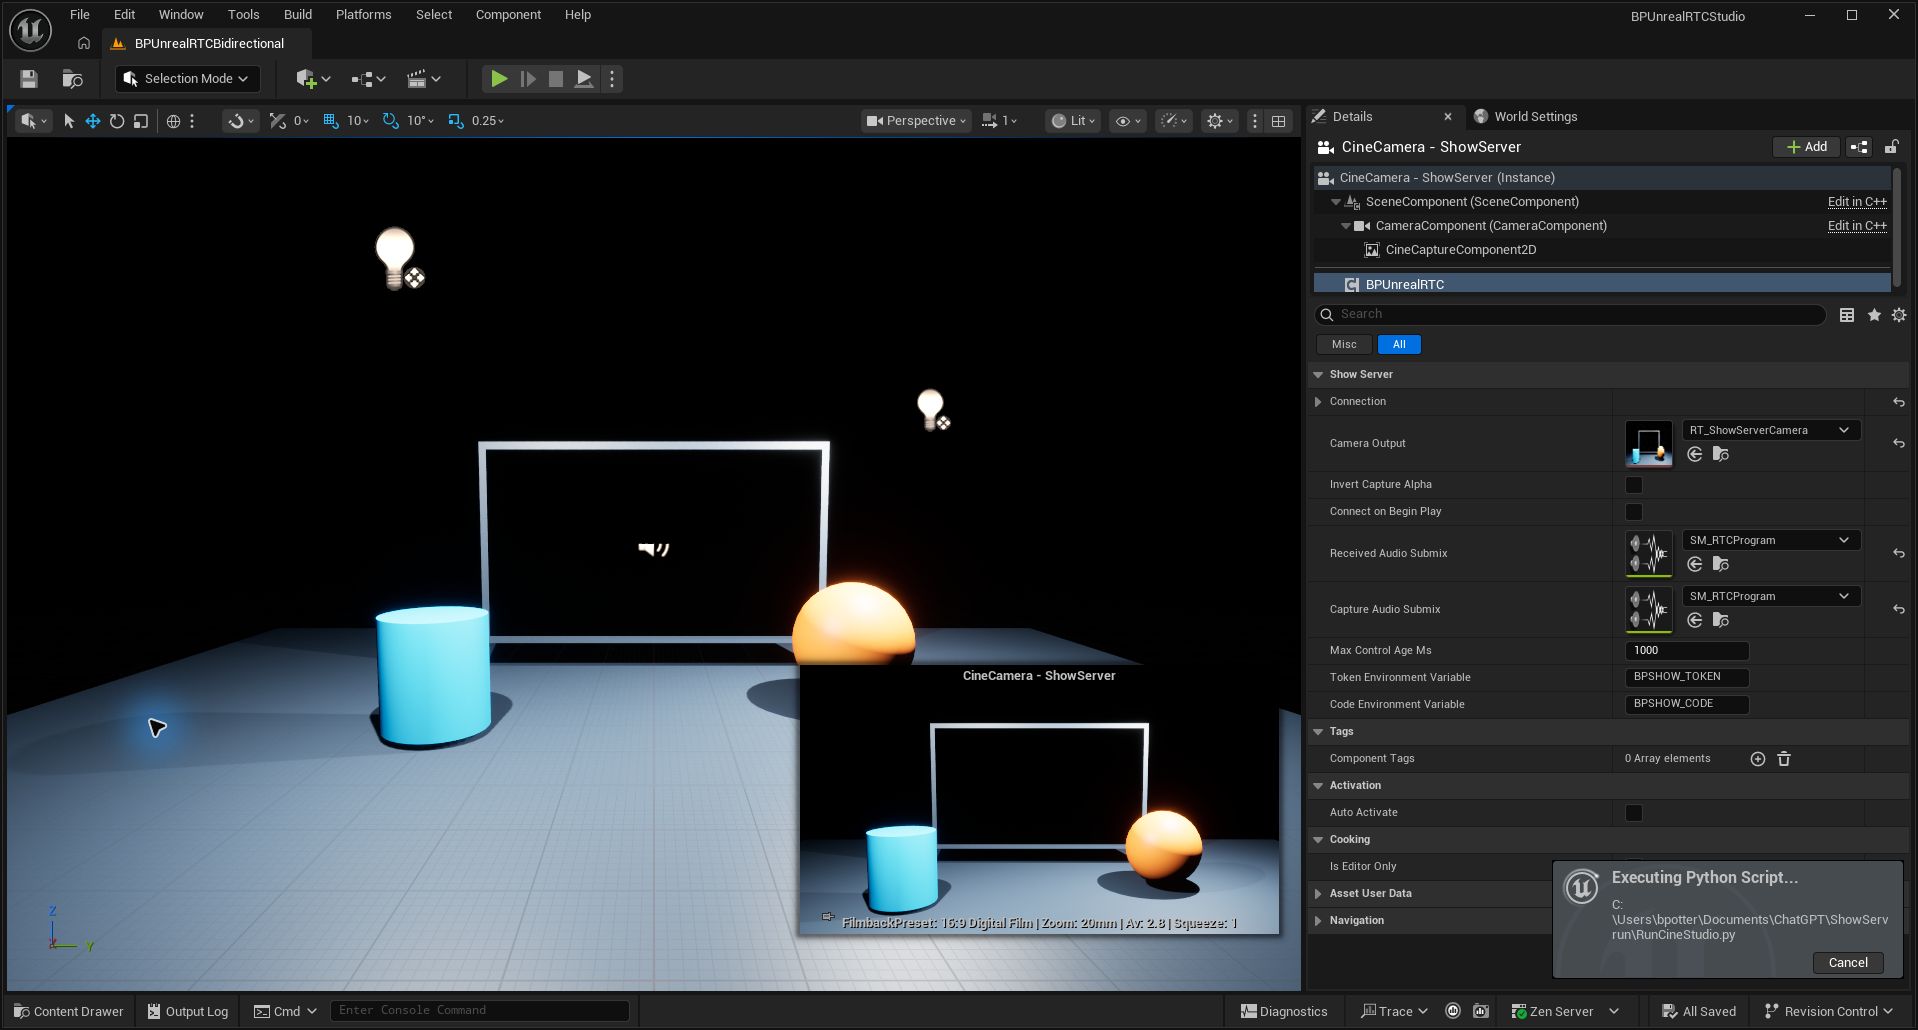
Keep audio running when switching applications
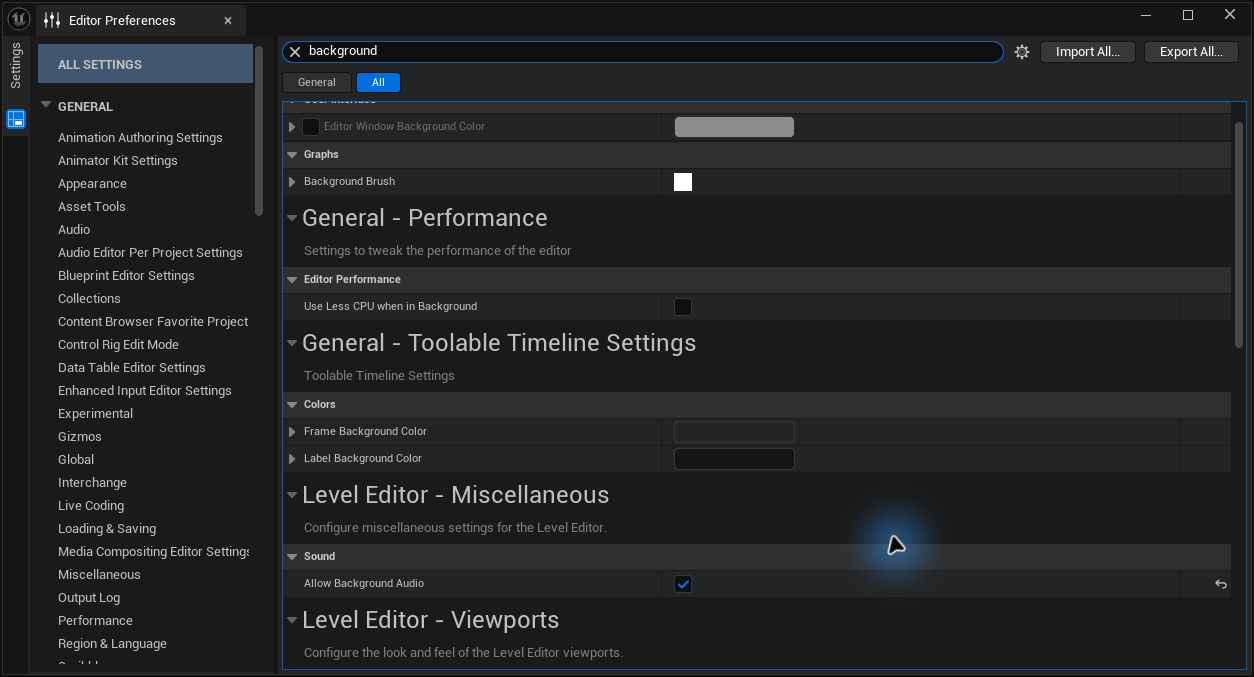
In Edit → Editor Preferences, search Allow Background Audio and enable it. Also disable Use Less CPU when in Background for live production testing. These are editor preferences, separate from the project’s audio device settings. Otherwise, switching to ShowServer or MediaNode can mute or throttle Unreal while the network connection still looks healthy.
Received Audio Peak measures incoming PCM. Received Audio Mixer Peak measures the PCM consumed by Unreal playback. Captured Audio Peak measures the selected outgoing submix. These values help distinguish missing input, playback starvation, and muted or incorrect submix routing.
7. Exchange control data
On the same RTC component, bind On Facial Data, On DMXData, On OSCData, or the generic On Data event. Map those events into your project’s animation, lighting or Blueprint logic. Use Send Control Json or Send Data for the reverse direction. Video-surface setup does not automatically bind DMX fixtures or a character rig.
The local test received facial envelopes and applied OSC position and DMX intensity changes using a separate control subscription component. The CineCamera component remained subscribed to the movie feed. This validates the transport and sample bindings; it does not validate a facial character rig.
See Control messages for the actual payload schemas, stream IDs, sequence numbers and staleness rules. Start with one control and verify its effect before wiring the rest of the scene.
8. Move the same project to Cloud (optional / advanced)
Prefer the LAN path above first. If you already operate a Cloud-capable ShowServer deployment, continue with the steps below or see Remote / Cloud studio.
Use the same components and render targets. Set the connection’s Cloud property and the ShowServer Cloud Base Url, and pass a current pairing code to Connect → Cloud Code. See Cloud and venue output for deployment and acceptance checks. MediaNode is still optional.
For an unattended renderer, use a packaged project and supply credentials through your deployment’s runtime configuration. Keep an actual render-capable RHI/GPU and a functioning audio mixer. A dedicated server or NullRHI process cannot render the camera output.
Troubleshooting
| Symptom | Check |
|---|---|
| Camera output is blank | Cine Capture is parented to CineCameraComponent; Texture Target and Camera Output reference the same 8-bit target; Play has begun. |
| Monitor is blank | Correct Source Id, Source Actor, material slot and RTCVideo parameter; the source is actually publishing. |
| Movie races ahead | Update BPMediaNode to a build containing the FFmpeg file pacing fix. Changing Unreal capture FPS does not fix source playback speed. |
| Audio disappears when switching windows | Enable Allow Background Audio in Editor Preferences; then verify the selected submix. |
| RDP reconnect changes sound | Check whether Windows has added or removed the Remote Audio device. Validate unattended operation separately from an active RDP session. |
| A plugin class does not appear | Verify the built package, matching engine version, enabled plugin and editor restart. |
| AuthenticationRequired | Obtain fresh credentials and reconnect; retries cannot repair revoked authentication. |
See Media Framework and NDI comparison for the integration differences.
BPUnrealRTC currently uses render targets and received textures directly. It is not yet a standard Unreal Media Output/Media Source provider. Cine Camera documentation describes Epic’s capture component.